
Isn’t this how you’ve been organizing your projects—Google Drive uploads, code images, and even the next-level audiobook idea? While innovative, these methods can quickly grow messy. Let me introduce you to Git. 🚀 With Git, you’ll be able to efficiently track changes, collaborate seamlessly, and ensure that your project history is always intact.
What is Git and Why Use It?
Think of Git as your project’s personal time machine and team collaboration tool for your projects. It’s a Distributed Version Control System (DVCS), which means it keeps track of every change you make to your files, allowing you to easily go back to earlier versions if needed.
Git is great for:
- Keeping your work organized: It neatly stores all the different versions of your project.
- Tracking changes: You can see exactly what was changed, when, and by whom.
- Working with others: It makes collaborating with teams much easier.
Because Git is a DVCS, everyone working on the project has a full copy of the project and its history. This makes it fast, allows you to work offline, and provides a built-in backup. Even if it seems a bit tricky at first, Git helps you experiment without fear, knowing you can always undo mistakes and easily combine your work with others.
But how does Git work?
Basic Git Workflow
- git init – You start by setting up your project with Git.
- git clone – If a project already exists, you can clone it to get onboard.
- git add – You prepare and stage your changes before committing.
- git commit – This locks in your changes as a snapshot of your project.
- git push – Your changes are now uploaded to a remote repository.
- git pull – You retrieve the latest changes from the remote repository to stay up to date.
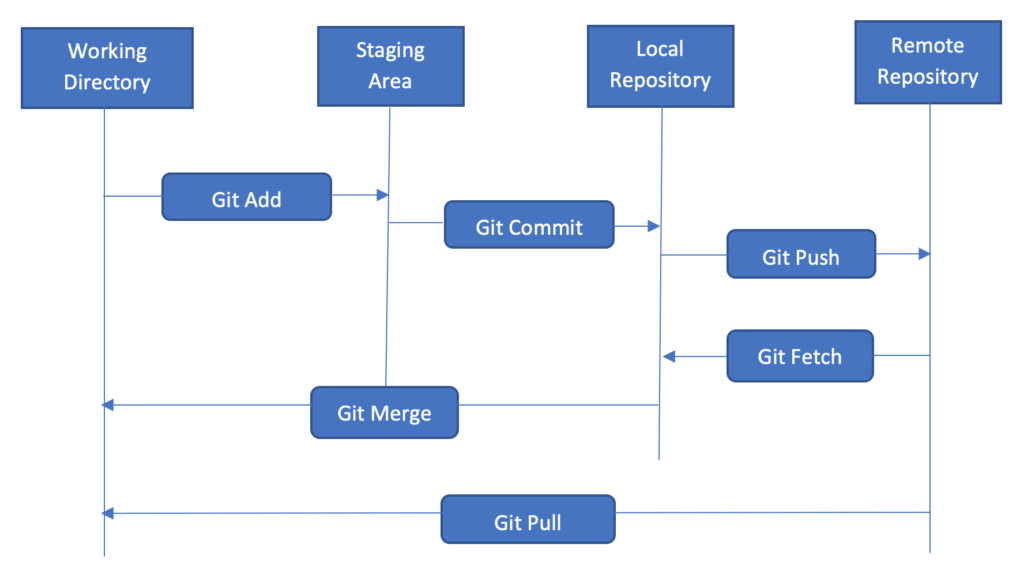
By following these steps, you can ensure your project is always organized and up to date. Let’s explore each of these steps in more detail:
- learn how to set up git by going here
- set up your project with Git by heading here
- clone a repo with Git by heading here
- learn the status of git by heading here
- stage changes with add command by heading here
- commiting changes with the commit command by heading here
- Pull and push the changes with git pull and push by heading here
Setting Up Git
First, see if Git is already installed. Open your command line (Terminal on Mac/Linux, Command Prompt or PowerShell on Windows) and type:
git --version
If you see a version number, Git is ready to go! If not, head over to Git’s official website to download and install it for your operating system. The website provides detailed instructions for each platform (Windows, macOS, and Linux), guiding you through the installation process step by step. Just pick the instructions that match your computer’s operating system and follow along! Once Git is installed, it’s time to configure it with your personal information. This helps Git keep track of who’s making changes to the projects.
Configuring Git User Details
Open your command line again and enter the following commands, replacing “Your Name” with your actual name and “[email protected]” with your email address:
git config --global user.name "Your Name"
git config --global user.email "[email protected]"
The --global option tells Git to use these settings for all your projects on this computer.
To make sure everything is set up correctly, you can view your Git configuration by typing:
git config --list
This will display a list of all your Git settings, including the name and email you just configured. If you see your information in the list, you’re all set and ready to start using Git!
Initializing a Repository with git init
When starting a new project and you want to use Git for version control, the first step is to initialize a Git repository in your project folder. You can do this by using the git init command. Navigate to your project’s folder in the command line, and then run git init. Running this command sets up a new local repository, allowing Git to track any changes you make to your project files.
The git init command creates a hidden directory called .git within your project folder. This directory is essential because it stores all of the version control history and metadata that Git needs to manage your project. It’s where Git keeps track of all the different versions of your files, commit messages, and other important information.
Remember to use git init only once per project, right at the beginning. This sets the stage for all future Git operations. After initializing the repository, you can start adding your project files, making commits, and utilizing other Git features to manage your project’s development effectively.
Important: Make sure you’re in the root directory of your project before running git init.
Cloning an Existing Repository with git clone
When you want to work on an existing project or collaborate with others, you can use the git clone command to copy an existing Git repository to your local machine. This is particularly useful for joining ongoing projects or working with open-source code. To clone a repository, simply use the command
git clone <repository-url>
replacing
The git clone command does more than just download the repository files. It also sets up a connection with the remote server, creating a link between your local copy and the original repository. This connection is typically named origin, which is the default alias for the remote repository from which you cloned a project.
When you run git clone <repository-url>, Git automatically assigns the name origin to the repository you cloned from. This allows you to refer to the remote repository using origin instead of typing out the full URL each time, making origin a convenient shorthand for the remote repository’s address.
To check which remote repositories are linked to your project, you can use the command
git remote -v
This will display the URLs associated with your remote repositories, including origin. The concept of origin is frequently used in many Git commands, such as git pull, which we’ll discuss in more detail later. Understanding origin is crucial as it simplifies working with remote repositories and is a fundamental part of Git’s collaboration features.
Remember, you should use git clone when you’re joining an existing project or when you need to work with a repository that’s hosted remotely, such as on GitHub or GitLab. This command is typically used once at the beginning of your involvement with a project, setting up your local workspace with all the necessary files and version control information.
Checking Repository Status with git status
The git status command is a crucial tool for checking the current state of your working directory in a Git repository. It provides valuable information about the status of your files and your branch’s relationship to the remote repository.
When you run git status, it tells you which files have been modified since your last commit, which files are staged and ready for commit, and whether your local branch is ahead or behind the remote repository. If a file is listed under ‘Changes not staged for commit’, it means you’ve modified the file, but you haven’t yet told Git that you want to include those changes in your next save. This information is essential for maintaining a clear understanding of your project’s state and making informed decisions about your next actions.
For example, a typical output might look like this:
On branch main
Your branch is up to date with 'origin/main'.

Changes not staged for commit:
  (use "git add <file>..." to update what will be committed)
    modified: index.html

Untracked files:
  (use "git add <file>..." to include in what will be committed)
    newfile.js
This output tells you that you’re on the main branch, which is synchronized with the remote repository. It also shows that index.html has been modified but not yet staged, and newfile.js is a new file that Git isn’t tracking yet.
It’s a good practice to use git status frequently, especially before staging, committing, or pushing changes. This habit helps you avoid accidentally committing unwanted changes or forgetting to include new files in your commits.
Remember, git status is a safe command that only displays information without modifying your repository. You can run it as often as you like without worrying about altering your project’s state
Staging changes with git add
When working with Git, it’s important to understand that changes made to files are not automatically tracked. To prepare these changes for a commit, we need to add them to the staging area. The staging area, also known as the index, is a file that stores information about what will be included in the next commit.
Think of the staging area like a packing box. You choose which modified files you want to put in the box (git add) before shipping it off (git commit). To stage changes, we use the git add command. If you want to stage a specific file, you can use
git add <filename>
replacing git add index.html would stage changes made to the index.html file.
If you want to stage all changes in your working directory, you can use the command (note the dot at the end)
git add .
This command adds all modified and new files to the staging area, preparing them for commit.
The git add command is typically used before committing, as it allows you to select which changes should be saved in the next commit. This selective staging gives you fine-grained control over your project’s history, allowing you to group related changes into logical commits.
Remember, staging is an intermediate step between making changes and committing them. It gives you the opportunity to review and organize your changes before they become a permanent part of your project’s history.
Committing changes with git commit
Once you’ve staged your changes using git add, the next step is to save them as a commit. A commit in Git captures the state of your project at a specific point in time, creating a snapshot of your work that you can return to or share with others. To create a commit, you use the git commit command followed by a message describing the changes. The standard format is
git commit -m "feat: description of changes"
where “feat” indicates a new feature (you can use other prefixes like “fix” for bug fixes or “docs” for documentation changes) and the description briefly explains what you’ve done. Refer here for commit conventions.
Here are some examples of good commit messages:
feat: Add user authenticationfix: Correct typo in documentation
It’s better to avoid messages like:
Fixed stuff
If you’re collaborating with others and want to give credit to contributors, Git allows you to add co-authors to your commits. This is particularly useful in team environments or open-source projects. To add co-authors, you can use a slightly modified commit command:
git commit -m "feat: description Co-authored-by: Name <[email protected]>"
You can add multiple co-authors by including additional “Co-authored-by” lines.
It’s important to make commits after adding changes to the staging area, as this saves a version of your work. Regular, well-described commits create a clear history of your project’s development, making it easier to understand changes over time, revert to previous states if needed, and collaborate effectively with others. Remember, a good commit message should be concise yet descriptive, helping future you (and others) understand what changes were made and why.
Pulling the Latest Changes with git pull
Before starting work on a project, it’s crucial to ensure your local version is up to date with the latest changes from the remote repository. This is where the git pull command comes in handy. By using
git pull origin branch_name
you fetch the most recent updates from the specified branch on the remote repository and merge them into your local branch.
The git pull command is essentially a combination of two operations: git fetch, which retrieves new commits from the remote repository, and git merge, which integrates these changes into your local branch. This process helps you stay synchronized with your team’s work and avoid potential merge conflicts (a situation where Git can’t automatically combine changes). We will see how to solve merge conflicts in a later blog.
For example, if you’re working on the main branch, you might use: git pull origin main. This command fetches the latest changes from the ‘main’ branch of the ‘origin’ remote and merges them into your current local branch.
It’s a good practice to use git pull before you start working on a project or before creating a new branch. This habit ensures you’re building upon the most recent version of the codebase, reducing the likelihood of conflicts when you later try to merge your changes back into the shared repository.
Remember, while git pull is powerful, it’s important to use it thoughtfully. If you have uncommitted local changes, pulling might lead to conflicts. In such cases, you might want to commit or stash your local changes before pulling.
Pushing changes to the Cloud with git push
After you’ve made and committed changes to your local repository, the next step is to share these changes with others by pushing them to a remote repository. This remote repository could be hosted on platforms like GitHub, GitLab etc. To push your changes to a specific branch in the remote repository, you use the command
git push origin branch_name
replacing “branch_name” with the actual name of the branch you want to update.
For example, if you’re working on the main branch, you would use: git push origin main. This command uploads your local commits to the remote repository, making your changes visible to other collaborators. It’s important to note that you can only push commits, not individual file changes. This is why it’s crucial to commit your changes before pushing.
Pushing your changes is typically done after you’ve completed a feature, fixed a bug, or reached a significant milestone in your work. It’s a way to share your progress with your team and contribute to the overall project. Remember, before pushing, it’s a good practice to pull the latest changes from the remote repository to ensure you’re working with the most up-to-date version and to avoid potential merge conflicts.
Conclusion
Git is an invaluable tool for version control, enabling smooth collaboration and efficient project management. By grasping the fundamentals of Git, you’ll be equipped to:
- Save time and reduce errors: Git helps streamline your workflow and minimize the risk of mistakes.
- Collaborate effectively: Git facilitates seamless teamwork and enables easy sharing of code.
- Maintain a detailed project history: Git meticulously tracks every change, providing a comprehensive record of your project’s evolution.
Next Steps:
To further enhance your Git skills, consider exploring these advanced concepts and tools:
- Branch Management:
- Master Git branches for parallel development
- Learn merging and rebasing techniques
- Advanced Operations:
- Use Git stash to manage temporary changes
- Develop strategies for resolving merge conflicts
- Collaboration Tools:
- Explore GitHub pull requests for code review and team collaboration
- Understand forking and contributing to open-source projects
- Visual Git Tools:
- Try GitKraken for a user-friendly graphical interface
- Integrate GitLens in VS Code for enhanced Git functionality within your IDE
- Git Workflows:
- Study popular Git workflows like Gitflow or GitHub Flow
- Implement continuous integration/continuous deployment (CI/CD) with Git
By mastering these topics, you’ll significantly improve your version control skills and become a more effective developer and collaborator.
Bonus: Git Cheat Sheet
| Command | Description |
|---|---|
git init | Initialize a new Git repository |
git clone <repo-url> | Clone a repository |
git status | Check the status of files |
git add <file> | Stage a file |
git commit -m "message" | Commit changes |
git push | Push changes to remote |
git pull | Pull changes from remote |